

So, you’re diving into Gunsmith Part 1, huh? Lucky for you, I’ve spent way too many hours obsessing over this task. If you’ve made it this far in Tarkov, you’re probably already familiar with the pain that is gun modding—trust me, it’s a beautiful mess.
Anyway, here’s the kicker: Gunsmith Part 1 is the first big task you get from Mechanic. And while it doesn’t sound that bad (you just need to mod a shotgun, right?), there’s a few things about this that’ll trip you up unless you’ve done your homework.
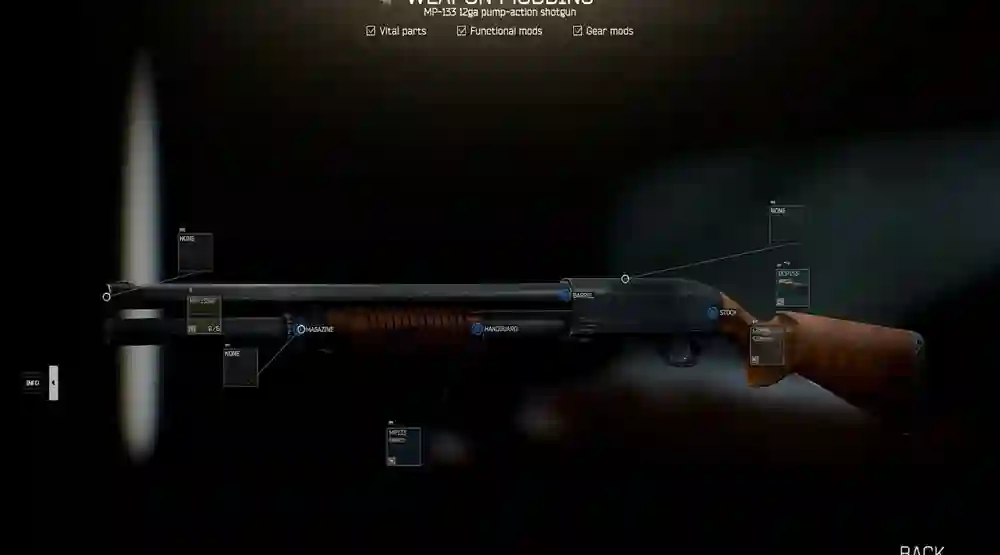
What Is Gunsmith Part 1, Anyway?
At its core, Gunsmith Part 1 is a quest where you have to mod an MP-133 shotgun to meet a bunch of very specific requirements. Think of it like baking a cake—you’ve got your ingredients, but you need to follow the recipe exactly or things go sideways fast.
The shotgun you’re working with has to meet a set of stats:
- More than 47 ergonomics (because you want it to feel nice and snappy, not like dragging a brick).
- Less than 850 recoil (you don’t want your shots bouncing off the moon).
- Length less than 1,000 mm (because a shotgun with a broomstick-sized barrel just ain’t it).
- Add a flashlight (because we’re not savages).
I promise, once you hit that “Turn In” button, the sweet satisfaction will make you forget the hours you spent figuring out why your MP-133 kept looking like a piece of garbage.
The Parts You Need for Gunsmith Part 1
You’ll need a handful of parts to get the job done. Here’s what you’re looking for:
- MP-133 12ga Shotgun (obviously). You can snag this from Jaeger (if you’ve unlocked him) or off Scavs. I got mine off a random Scav kill, which felt like an absolute win.
- Plastic Forestock with Rails – This thing is crucial if you want to mod it for that perfect balance. It’s a bit of a pain to find in the wild, but the rails are what you need for later attachments.
- Kiba Arms Tactical Foregrip – Now, don’t skimp on this one. It’s the best grip for your ergonomics, and it helps with recoil. It’s one of those parts that sounds boring but is super important.
- Zenit Klesch 2P Flashlight – This is the light that will attach to your foregrip. Don’t try to shortcut this and use a random flashlight—I’ve learned that lesson the hard way. Mechanic isn’t forgiving about that.
- Any compatible stock or no stock at all – I didn’t bother with an expensive stock and just went for the default. The MP-133 can be surprisingly comfy without it.
When you’re piecing all this together, make sure to double-check the gun’s overall length and stats. You can almost hear the Mechanic grumbling through the screen if you mess that up.
How to Modify Your Shotgun for Gunsmith Part 1
Here’s where the magic (and the frustration) happens. Modding the MP-133 for Gunsmith Part 1 requires a little finesse. It’s not just about throwing on the first parts you see—it’s about balancing all the requirements like a juggler on a tightrope. Too much of one thing, and you’ll miss the target completely. Anyway, let’s break this down:
Step 1: Start With the MP-133
First things first: Get the shotgun. You don’t need anything fancy here—just the basic MP-133 (it’s that old-school, pump-action beauty). Once you’ve got it, check its durability. If it’s beaten up, consider getting a fresh one.
Step 2: Slap on the Forestock and Foregrip
Now, add the plastic forestock with rails and attach the Kiba Arms Tactical Foregrip. This part is all about ergonomics, which translates to how nice it feels in your hands. The grip helps you control the shotgun’s recoil too, so this part is critical for keeping the MP-133 manageable during firefights.
Fast forward past three failed attempts—this is the one mod I recommend for all you newbs. It’ll save your sanity.
Step 3: Add the Flashlight
You know what they say—light’s the last frontier. Well, not really, but in Tarkov, a flashlight is a must-have. Attach the Zenit Klesch 2P Flashlight. You’ll need it for your quest, and hey, it doesn’t hurt to have a light when you’re clearing those dark rooms. Plus, the Klesch just looks cool.
Step 4: Check Stats & Make Adjustments
Before you hand over the MP-133, double-check its stats. Here’s where it’s easy to mess up. I learned the hard way that one mod can push your stats over the limit, so pay attention to:
- Ergonomics (should be >47)
- Recoil (keep it under 850)
- Length (under 1,000 mm)
- The flashlight is attached, naturally.
Once you’re happy with everything, click the “Turn In” button, and you’ll have completed Gunsmith Part 1.
Where to Find All the Parts
Now, you’re probably wondering: “Where do I get all this stuff?” I get it. Tarkov’s like a massive garage sale, and finding the right parts can feel like trying to dig through a pile of junk. Here’s a breakdown of where to look:
Vendor Options
- Jaeger: Once you unlock him, Jaeger is a godsend for early shotguns and mods. Don’t underestimate him.
- Skier: He’ll usually have some mod options, but you’ll need to level up your rep first.
- Peacekeeper: He sometimes has mod kits or accessories that fit.
The Flea Market (When You’re Level 15)
- That’s right—only level 15 gets you full access to the flea market. So, if you’re in the 10-14 range, get to grinding.
Pro Tip: Before hitting the flea market, check out Tarkov’s popular Discords and Reddit. You’ll get the inside scoop on deals from other players, and maybe even a few trades.
How to Avoid Classic Mistakes
We all make mistakes, but some in Tarkov can cost you dearly. Don’t let these mistakes be the ones that haunt your Gunsmith Part 1 experience:
Classic Blunders:
- Not checking ergonomics: A bad grip can leave you in a world of hurt.
- Wrong flashlight: Trust me, the Zenit Klesch is a must. Anything else and you’re out of luck.
- Over-using stock mods: Keeping it compact is key for this task, so avoid those long, bulky attachments.
- Neglecting durability: I still curse myself for handing in a shotgun with low durability that I thought was fine.
Why Should You Even Bother With Gunsmith Part 1?
“Okay, I get it—gunsmithing is cool, but what do I get out of it?” I hear you. Well, apart from the sweet satisfaction of not screwing it up (like I did countless times), completing Gunsmith Part 1 rewards you with some nice perks:
- Experience: Pretty valuable early in the game. I was all about unlocking higher-level traders after completing my first Gunsmith quest.
- Roubles: You’ll need these for your next big mods.
- Unlocking future quests: Complete Gunsmith Part 1 and you’re one step closer to the really fun tasks. Plus, Mechanic gives you rep, which is huge.
Final Thoughts
Alright, I think you’re ready. Once you’ve completed Gunsmith Part 1, you’ll feel like a weapon modding champ. It’s a process—kind of like my failed attempts at herb gardening—but it’s totally worth it. So, dive in, make those mods, and get ready for Gunsmith Part 2—because, trust me, you’re going to need that experience.
Now, go out there and make that shotgun your own. And remember: even if you mess up… you’ll still probably have time for a second attempt before your next raid.